Pages

11/12/2017

Vyatta vRouter Appliance: Using BGP to distribute 'firewall' rules

A while ago I attended a Mikrotik User Meeting or MUM for short. For those of you that don't know, Mikrotik are a Latvian company that make networking hardware and an operating system known as RouterOS, that will act as a router and firewall. Their 'USP' is value for money. £22 will get you a home router that will support OSPF, BGP, MPLS et and £2736 will get you a router that will route almost 80Gb/s. Nice.

The MUM consisted of various presentations and demonstrations and one which caught my eye was a presentation from Barry Higgins from Allness, who demonstrated using OSPF to distribute a black list of bad guys which were then null routed, a nice method of distributing 'firewall' rules on a bunch of routers automagically. You can view his presentation on Youtube.

I've recently been playing Vyatta vRouter appliances and wondered if I could apply a similar method of injecting a black list from an IDS (Intrusion Detection System) and having it distributed via BGP.

25/09/2017

Hidden London: Charing Cross

If you've read any of my blog posts it may have come apparent that I have a bit of a 'thing' for the London Underground. I can't tell you how many bogies are on an S Stock train or the unladen weight of a Bakerloo line train so I've not reached full anorak status yet, but I do go on the Hidden London tours whenever I can.

About a month ago my wife and I attended the Hidden London: Highgate Wilderness Tour which was a little disappointing, but this time round the Charing Cross really delivered. It didn't quite top Aldwych Station, but was certainly better than Highgate and Euston. If I had to recommend two tours out of those that I've attended so far, I'd say Aldwych and Charing Cross are the ones to go for.

The Jubilee line used to terminate at Charing Cross prior to the extension to Stratford, so the tour gives you the opportunity to see the disused Jubilee platforms and some of the other areas of the station that are usually closed to the public.

If you intend on going on the tour and want to keep it a surprise, I suggest you stop reading here. If you won't be going on the tour or want to see if its worth £35 English Pounds, read on...


07/09/2017

Flashing the DVMega UHF with the latest firmware using an Arduino Uno and a Raspberry Pi

In case you've missed it, there's a new firmware release out (3.17) for the DVMega - a small transceiver that can operate as a Digital Mode Hotspot that supports DMR, D-Star and Fusion.

Unless your DVMega is brand new (purchased after 2017-09-07) it's safe to assume you're on an older version. You can always check your current version in the MMDVMHost logs or your preferred MMDVMHost dashboard.

Unfortunately there's no built in way to upgrade the firmware, which leaves you with a couple of choices depending on your board-

  1. Remove the large chip and flash it with an Arduino Uno, a microcontroller that uses the same chip as the DVMega (UHF Version Only!)
  2. Solder a wire between two points on the board and program it direct from the host computer or Raspberry Pi. (Both Versions)


If you'd prefer to solder the wire to avoid having to purchase an Arduino Uno, or in the case of the dual band version you have no choice, I thoroughly recommend G0WFV's blog post, which inspired me to write this one for flashing with an Uno.

If you'd prefer to use an Uno because you're either not confident with the soldering or in my case you'd rather not have an unsightly wire flapping around on your DVMega so you can flash it twice a year, then read on.
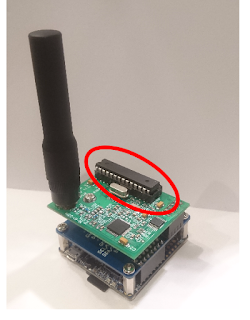
DVMega on a custom Orange Pi Zero 'Hat' with the chip circled


Disclaimer

This is a hands on process. Whilst its unlikely that you will make the chip completely unusable (unless your short it or insert it the wrong way around) its plausible that the flashing may fail part way through rendering your DVMega temporarily out of action. You should just be able to flash it again to fix the issue, but I can't accept responsibility if it goes wrong.

Preliminaries

To use the Arduino Uno method you will first need an Arduino Uno and the appropriate cable (Usually USB 2.0 B type). Make sure you get an Uno with the full sized chip and not one of the SMD models. A 'clone' or 'compatible' version should work fine. The cheapest I could find was £5.49 on Ebay but double check with the seller that they're shipping the full sized DIP version first.

In theory you should wear an anti-static wrist strap whilst working with semiconductors, but I've not had any issues going without.

Don't plug in or power up the Arduino Uno until instructed to do so!

Swapping the chips

In order to program the DVMega chip you will need to remove the large black chip from both boards, place the DVMega chip in the Uno, flash it, and then swap them back. It might be sensible to mark the DVMega chip with some paint, tipex, nail varnish, whatever you have handy.

If you have one handy you can use a fancy IC extractor, however my cheapo one usually causes more harm than good. Instead I use a thin flat blade screw driver and insert it into each end and twist it slightly to loosen the chip. Once loosened you can usually just pull it out with your fingers. 

Be careful not to bend the pins! 

Whilst you're at it, make a visual note of the 'notch' and the 'dot' in the corner of the chip. For the UNO these should be furthest away from the USB connector, and on the DVMega they should be furthest away from the GPIO header socket.


The chip that needs removing from the UNO is circled.

Once removed, you can carefully push the DVMega into the socket of the UNO. You don't need to ram it all the way home, just enough to make electrical contact but ensure its still easy to remove.

Discovering the Arduino 'port'

Now the DVMega chip is in the Arduino, we can flash it. Connect to a terminal session running on the Raspberry Pi via SSH or a local screen and run-
sudo su

If you're running pi-star, make the file system read/write-
rpi-rw

Run dmesg to find out which 'port' the Arduino is connected to-
dmesg

You should see something like the following-
[    2.269154] usb 1-1.2: new full-speed USB device number 4 using dwc_otg
[    2.414242] usb 1-1.2: New USB device found, idVendor=2341, idProduct=0043
[    2.416199] usb 1-1.2: New USB device strings: Mfr=1, Product=2, SerialNumber=220
[    2.419794] usb 1-1.2: Manufacturer: Arduino (www.arduino.cc)
[    6.899923] cdc_acm 1-1.2:1.0: ttyACM0: USB ACM device

Which tells you that the Arduino is connected to /dev/ttyACM0.

Installing the software

Before you can flash the chip its best to ensure you have the correct software packages installed-
apt-get update
apt-get install avrdude zip wget

Downloading the new DVMega binary

Go to the DVMega software page and double check the latest version for your board. For the DVMega Single Band board you're looking for this section-

BlueDV-MMDVMhost

Raspberry PI based Support for D-Star, Fusion and DMR auto mode

Singleband and Dualband Radio

The current firmware is 3.17

Change into your home directory, just in case-
cd ~/

Download the firmware-
wget http://www.dvmega.auria.nl/images/DVMEGA_RH_V317_UNO.zip

Unzip it-
unzip DVMEGA_RH_V317_UNO.zip -d DVMEGA_RH_V317_UNO

Flashing the binary to the Arduino UNO

Change into the unzipped directory-
cd ~/DVMEGA_RH_V317_UNO

And run avrdude to flash the binary, remembering to change your serial port if necessary-
avrdude -p m328p -c arduino -P /dev/ttyACM0 -b 115200 -F -U flash:w:DVMEGA_HB_V317_UNO.cpp.hex

You should then see something like the following, indicating flashing was successful-
avrdude-original: Using autoreset DTR on GPIO Pin 7

avrdude-original: AVR device initialized and ready to accept instructions

Reading | ################################################## | 100% 0.01s

avrdude-original: Device signature = 0x1e950f
avrdude-original: NOTE: "flash" memory has been specified, an erase cycle will be performed
                  To disable this feature, specify the -D option.
avrdude-original: erasing chip
avrdude-original: reading input file "DVMEGA_HB_V317_UNO.cpp.hex"
avrdude-original: input file DVMEGA_HB_V317_UNO.cpp.hex auto detected as Intel Hex
avrdude-original: writing flash (31172 bytes):

Writing | ################################################## | 100% 6.09s

avrdude-original: 31172 bytes of flash written
avrdude-original: verifying flash memory against DVMEGA_HB_V317_UNO.cpp.hex:
avrdude-original: load data flash data from input file DVMEGA_HB_V317_UNO.cpp.hex:
avrdude-original: input file DVMEGA_HB_V317_UNO.cpp.hex auto detected as Intel Hex
avrdude-original: input file DVMEGA_HB_V317_UNO.cpp.hex contains 31172 bytes
avrdude-original: reading on-chip flash data:

Reading | ################################################## | 100% 5.06s

avrdude-original: verifying ...
avrdude-original: 31172 bytes of flash verified

avrdude-original: safemode: Fuses OK (E:00, H:00, L:00)
strace: |autoreset: Broken pipe

avrdude-original done.  Thank you.

strace: |autoreset: Broken pipe


If not, try hitting the reset button on the Arduino UNO a few times or removing the USB cable completely and reinserting it before running avrdude again.

Returning the chips to their relevant device

You should now be able to unplug the UNO, remove the chip and place it back into the DVMega using the same process as above.

Remember the orientation,  the 'notch' and the 'dot' on the UNO should be furthest away from the USB connector, and on the DVMega they should be furthest away from the GPIO header socket.

Now the chip is flashed and back where they should be, you should be able to stick the DVMega back on your Raspberry Pi or BlueStack and use it as you were before.

Acknowledgments


  • G0WFV - Wrote a blog post that inspired this one 
  • PE1PLM - DVMega Creator


73!

30/08/2017

Using the ZTE MF190 3G dongle with a Mikrotik Router

3G Dongles suck. Or maybe Linux support for 3G dongles sucks. Either way, if you're hoping to accelerate your hair loss, I can recommend attempting to setup a 3G dongle with a Linux based device.

This brief guide will cover setting up the ZTE MF190 modem with a Mikrotik router.

18/08/2017

Flashing a bootloader on to an STM32 'Blue Pill' using a Raspberry Pi

I am currently preparing some STM32 'Blue Pill' Microcontrollers for use with an Amateur Radio project. From the factory these appear to arrive without USB support, so before we can flash any firmware over USB you must first flash a new bootloader over the UART interface.

I used a USB to Serial adapter set to 3.3v, but you could use the Raspberry Pi's UART if you wish. Remember, if you're using the Raspberry Pi 3 you will need to disable the built in bluetooth and TTY running on the UART first.

13/08/2017

Hidden London: Highgate wilderness walkabout

It's no secret that I'm a big fan of the London Underground. To be clear, I don't consider myself a true anorak as I can't tell you the exact diameter of the wheels on an S Stock Car or the top speed of a fully laden A stock train, but I have an appreciation of the infrastructure and history of the Underground.

Having attended Hidden London tours of Aldwych, Euston and riding the Metropolitan No. 1 steam locomotive between Watford and Chesham, I grabbed some tickets for the newly announced 'Hidden London: Highgate wilderness walkabout' tour as soon as they were released.

My wife and I attended the tour today and both left a little disappointed, primarily due to the cost of the event - £31.50 each. Perhaps we had misguided expectations, however in comparison to Euston and Aldwych (£36.50) and the steam train (£20.00) which were all all fantastic experiences, the pricing seems a little ambitious.


If you plan on going on the tour and don't want any spoilers, stop reading here! However if you're not planning on going or are now having second thoughts and want to know a little more about our experience, read on.


Discovering and updating a guests hostname from the GNS3 API.

In a previous post, I reinvented the wheel whilst trying to discover the hostname of the GNS3 API from within a guest. Once I'd wasted an evening reinventing DNS, it was time to move onto the main objective - allowing a guest to discover its GNS3 hostname from the API and update the relevant entries in /etc/hostname and /etc/hosts, so next time the puppet agent ran it would pull the appropriate configuration.

I've chosen to use Python as it's the language I'm most confident with. You can view the GNS3 API documentation here

This script was created for Debian and Ubuntu based hosts but will probably work for other distros with minimal tweaking. If you want to skip the blog post and view the code, it's on github

04/08/2017

Requesting custom DHCP options with dhclient, or in my case, reinventing the wheel!

Occasionally I do stuff that's not amateur radio related. Today was one of those days.

I'm currently preparing a virtualised 'lab' to experiment with VoIP (Voice over IP), networking, and potentially some DMR network (radio) stuff in the future. I will be using GNS3, a program that was created to emulate networking devices but now also does a great job of emulating servers and their associated network topology.

Historically when using GNS3 I've configured each 'node' manually, however its 2017, dev-ops is hot, and manual configuration is not. Enter puppet, a configuration management tool that treats configuration more like code. You create a 'manifest' that contains instructions and templates on how to configure a device, and then an agent will then pull the configuration from the puppet master and apply the changes. Simple.

As far as I can tell (It's early days), puppet relies heavily on using hostnames to figure out which device needs which configuration. However, virtualised nodes within GNS3 are usually built from a template, and will share the same hostname when first configured. Additionally when a node is created, I don't know its MAC address, UUID, or any other identifier until its created. GNS3 will allow you to configure a hostname 'label' however this isn't communicated with the node out the box.

So, the plan? Create a script that will run on each node, query the GNS3 API and discover its own hostname, update it, and then puppet can do its thing and pull the correct configuration. BUT. How will the node know the IP that the API is running on?

I figured I could use DHCP options to send the IP of the API to the node, so it could then query the GNS3 API and grab it's hostname. I did the research and leg work, and then had an epiphany - what if someone had already invented a service that allows a device to find the IP address of a service... like... the Domain... Name... System. DNS.... Already invented.

For the sake of posterity, I've written up my findings below.


01/08/2017

Flashing MMDVM on an STM32 Nucleo using OS X


As you may already know from a previous post, I've been experimenting with MMDVM (Multi Mode Digital Voice Modem), software that can be used to operate a DMR radio hotspot or repeater. Historically I've been using a DVMega hotspot 'shield' on a Raspberry Pi, however I'm now taking it up a notch and building a 'proof of concept' DMR repeater.

The MMDVM Modem is made up of several components-

  • The interface board - Interfaces with the radios and performs the necessary filtering and amplification of the Tx and Rx Signals
  • The Modem - an embedded microcontroller for doing the analog to digital and digital to analog conversion and sampling.
  • The Host - usually a Raspberry Pi. Manages the modem and performs actions such as relaying DMR frames to the network.

The MMDVM software will run on several different platforms including the Arduino Due, the Teensy's, and the STM32 Nucleo. The DUE's are EoL, and the Teensy's are expensive, which left the STM32 as the logical option.

This guide is aimed at flashing the STM32 Nucleo board (STM32F446RE) for use with one of F0DEI's highly recommended MMDVM boards using MAC OS X. If you're using another MMDVM board, you may need to tweak the Config.h file accordingly.

I've not used an STM32 Nucleo before, so I had to do some research to figure out how to flash it. I've written up my findings below.


If you're using Windows I recommend F5UII's blog post here

The STM32 Nucleo


F0DEI's MMDVM Board

I tested this on 03/05/2020 and it worked as expected!

16/07/2017

Making a DIY programming cable for the Tait 8105 Radios


I am currently building a project that utilises two Tait 8105 UHF radios. I needed to upgrade the firmware and configure the radios, but couldn't find a programming lead in the UK for sensible money. After a bit of research, I managed to build my own using a FTDI TTL-232RL USB adapter and a DB9 Breakout board.


02/07/2017

Using UDEV rules to ensure a USB serial device always links to the same location in /dev/

If you're using several USB serial adapters on a linux machine, you may have found that their /dev/ names change after a reboot. This can be frustrating if each serial port is plugged into a specific device and you want to always access it using the same /dev/ name.

Fortunately, udev rules exist that allow you to symlink a serial device to a name, persistently. Udev rules are very powerful and support lots of tweaking, but for now I will cover the basics of assigning a USB serial device a static name.

04/06/2017

More engineering trains at Moorgate

I regularly pass through Moorgate Tube Station on the way to and from work, and one of the disused platforms is often used for storing engineer trains and equipment.

Recently there was a collection of diggers and a bull dozer, all with tracks and wheels for using the rails-


30/05/2017

Puppet: Dipping my toes in the water

A need has arisen to get to grips with Puppet, a configuration management tool aimed at simplifying the management of large clusters of servers by creating a 'template' that's then applied to multiple devices, rather than making configuration changes manually to each server.

The tutorial below is heavily drawn from Melissa Anderson's Digital Ocean tutorial here, but I tend to find writing something down helps it stick, so here goes.


18/05/2017

A Raspberry Pi Based ADS-B receiver (Aeroplane Tracker)


I recently purchased a 868/916 MHz Antenna which allegedly has a frequency range of 800 - 2500 Mhz. It's my intention to use this with a UKHASnet node, but this will require some planning and construction.  Rather than waiting I thought I'd put it to use, and some members of the London Hack Space have been playing with PiAware, a software image that allows a Raspberry Pi and RTL-SDR dongle to receive ADS-B  location data from Aeroplanes and forward it to flightaware.com, a popular site for viewing live Aeroplane locations and additional information.


As I had all the required bits, I thought I'd give it a go.

22/04/2017

A Raspberry Pi and RTL-SDR based APRS iGate


APRS (Automatic Packet Reporting System) is an amateur radio based system for real time communications. These can include GPS location, short messages, weather reports and other telemetry such as the location of an amateur radio repeater.

APRS messages are often sent from low powered devices with limited range, so the protocol includes the use of digipeters - a device that receives an APRS message and then retransmits it, and iGates, devices that receive APRS and then send it to centralised systems over the internet.

One of these systems is aprs.fi, a site that stores and displays APRS data-


A few members of my local club (London Hackspace Radio Club) have been experimenting with APRS and found signal coverage is a little patchy in London, so I've decided to setup my own iGate. I'm hoping I will be able to pick up signals from the near by M25.

For more information, click 'read more'


05/04/2017

Push notifications from Tasker to Telegram

My father recently went on holiday and complained that because I didn't have WhatsApp he couldn't send me photos whilst he was away. I don't use WhatsApp for various reasons, primarily because it's tied to a mobile number, so I explored the alternatives.

I've dabbled with Telegram in the past and heard good things, so I thought I'd give it another go. The API is a lot more open than the previous instant messenger I was using (Google Hangouts) so I wondered to how 'hackable' it was. After some research I stumbled upon the ability to send notifications from Tasker (A 'scripting' type app for Android) to Telegram


Click 'read more' to see how to get Tasker to send notifications to Telegram


28/03/2017

Adding a Nextion display to a MMDVMHost Hotspot


In a recent post I ran through setting a Raspberry Pi as a DMR hotspot using a DVMega and MMDVMHost.

MMDVMHost natively supports various displays including various TFT's manufactured by Nextion, 128x64 OLED screens commonly seen in Arduino projects, and HD44780 based LCD displays.


I wanted something colourful but still compact, so I went with a 2.4" Nextion screen available on Ebay here for around £12.50.  Shipping from China took just over 2 weeks which is satisfactory.


I also required a USB to Serial adapter to drive the display, as the Raspberry Pi's built in serial port was already being used to control the DVMega. This was purchased from Ebay here for £2.70.


The end result (Enclosure coming soon!)

For the instructions, click 'read more'

20/03/2017

Using a Raspberry Pi 3 as a WiFi Client and Access Point simultaneously.

The Raspberry Pi 3 has a built in Wifi chip, which supports client mode (Connecting to a network) and access point mode (Hosting the network other clients connect to). It can also do these simultaneously, allowing the Pi to connect to a network via Wifi (Or Ethernet, or 3G) and share its connection with other devices.

This can be useful in the case of public Wifi that requires some kind of login or registration. As I run my Pi 'headless', I can't authenticate via the Pi itself, but I can now connect to the Pi's access point and go through the registration process. It also means on networks that block client-to-client communication, a device can still access services hosted on the Pi and still access the internet.


Please find the instructions below.

19/03/2017

Using the Raspberry Pi based DMR hotspot with BlueDV

In my previous post I provided a tutorial for setting up a DVMega and Raspberry Pi to use as a DMR hotspot.

The DVMega can also be used in a bluetooth only configuration where the heavy lifting is done my another device, such as an Android or iOS handset. The bluetooth hardware seems to go by a few different names but can be purchased here. The software to do this was previously called openSpot, but has been renamed blueDV.


As I have already got the DVMega and Raspberry Pi 3 package, I thought I'd have a go at 'converting' it to be suitable for use with blueDV. I found some information on doing this on G0WFV's blog, which sets up ser2net so blueDV can communicate over 'serial' over Ethernet.

Some of the steps were already performed prior to installing MMDVMHost, so I've added the modified steps below.


12/03/2017

A DMR Hotspot using a Raspberry Pi, DVMega and MMDVMHost.

NOTE: This post is now a year old. MMDVM is a fast moving target, and raspbian has since been updated, so these instructions may be out dated. I throughly suggest you use the Pi Star image instead.

To celebrate passing my foundation radio license I treated myself to a Connect Systems CS-580 DMR Radio. DMR (Digital Mobile Radio) is a digital standard that digitises and compresses the audio, allowing two simultaneous conversations to occupy the same amount of bandwidth as a single narrow band call using a traditional FM radio. There's a lot more to it than than, but it's probably best covered in another post.

Unfortunately I discovered signal strength  from my local DMR repeater GB7WL was marginal, so I was unable to pick it up from the warmth and comfort of my flat. I initially considered fitting an external aerial, but that would leave me unable to roam around my flat as I'd be tethered via a cable to the aerial, so I started looking into hotspots - a low powered radio device that connects into the existing DMR networks over the internet and relays the voice traffic out of a small antenna. Plus, as I passed my intermediate license in the time it took for the CS-580 to arrive, I was due another treat...

I've heard good things about the SharkRF openSpot, a hotspot that works 'out of the box', but the inner hacker in me wanted something a little more customisable. I then stumbled across the DVMega, an add on 'shield' for the Raspberry Pi, and decided it would better suit my needs. The DVMega + Raspberry Pi also came out at approximately £150, which is £50 cheaper than the openSpot and includes a Pi that I can continue to use if I move on from DMR radio.

A DVMega on a Raspberry Pi 3

A DVMega on a Raspberry Pi 3

03/02/2017

Bailey's Comet at Moorgate

A London Underground Engineering train has been parked up at Moorgate station recently. As I'm a self-confessed train nerd I got off to take some photos - alas I'm not much of a photographer. 

The Roundels on the side says "Bailey's Comet" And I'm reliably informed it's a rail grinding train for smoothing out irregularities in the tracks. 

This engineer train is powered by electricity from the rails like a standard tube train, however some exist that are battery powered for when the current is off for maintenance. 


01/02/2017

Using a Cisco 887 Router as a VDSL Modem

I've had a Cisco 887 Router lying around gathering dust for a while and thought I'd put it to use as a VDSL Modem, replacing the existing Openreach box. In theory this will give me more visibility on line stats allowing me to do more logging and troubleshooting.


I tried it a while ago but had some MTU issues so it was banished back into storage. My ISP, Plusnet support 'Baby Jumbos' of 1508 Bytes which allows for a 1500 Byte frame + 8 Bytes of PPPoE overhead, so this time I configured the relelvant interfaces with a 1508 Byte MTU and its working nicely.

The configuration is pretty basic, partly due to limitations of the router. Ethernet0 (The DSL port) has a subinterface for Vlan 101 which is required by the VDSL infrastructure supplied by Plusnet / BT. Vlans 1 and 101 are transparently bridged to allow PPPoE passthrough, and I've added an IP on the bridge for management with some access lists for security.

The configuration is below. I can't make any guarantees it will work or it's secure, and I've redacted some of the sensitive information. Hopefully someone will find it useful or make suggestions for improvements.


Flat CAT6 Cable

I recently purchased some Flat CAT6 Cable for a grand total of £4.64 for 15M from Ebay with the intention of passing it through some double glazed window seals. When it arrived I was slightly taken aback at just how thin the cable was, around 6mm wide and 1.5mm thick. Great for squeezing through a tight window seal, but perhaps not so great for pushing packets.

2p for scale

To see if my scepticism was warranted I ran some iperf tests, and at 925 Mb/s I can't fault it-

C:\Users\matthew\Documents\iperf-3.1.3-win64>iperf3.exe -c 192.168.22.1 -b 1G
Connecting to host 192.168.22.1, port 5201
[  4] local 192.168.22.2 port 57144 connected to 192.168.22.1 port 5201
[ ID] Interval           Transfer     Bandwidth
[  4]   0.00-1.00   sec   100 MBytes   843 Mbits/sec
[  4]   1.00-2.00   sec   101 MBytes   846 Mbits/sec
[  4]   2.00-3.00   sec   112 MBytes   941 Mbits/sec
[  4]   3.00-4.00   sec   113 MBytes   947 Mbits/sec
[  4]   4.00-5.00   sec   112 MBytes   944 Mbits/sec
[  4]   5.00-6.00   sec   113 MBytes   946 Mbits/sec
[  4]   6.00-7.00   sec   113 MBytes   947 Mbits/sec
[  4]   7.00-8.00   sec   113 MBytes   946 Mbits/sec
[  4]   8.00-9.00   sec   113 MBytes   947 Mbits/sec
[  4]   9.00-10.00  sec   113 MBytes   945 Mbits/sec
- - - - - - - - - - - - - - - - - - - - - - - - -
[ ID] Interval           Transfer     Bandwidth
[  4]   0.00-10.00  sec  1.08 GBytes   925 Mbits/sec                  sender
[  4]   0.00-10.00  sec  1.08 GBytes   925 Mbits/sec                  receiver

31/01/2017

M6IJY

Ofcom completed their maintenance on Monday morning and I was able to login and swap my RSGB candidate number for a foundation level call sign.

The website is relatively limited and will only let you search for 3 letter suffixes rather than begins with / contains / starts with etc. In the end I gave up and let them allocate me a random call sign. I ended up with M6IJY (Mike 6 India Juliet Yankee).

I plan on doing some operating at the weekend at my local club, so hopefully I will make my first contact then.

28/01/2017

Amateur Radio Foundation Licence

Last weekend I attended a two day amateur radio foundation licence training course at the Loughton & Epping Forest Amateur Radio Society (LEFARS) which culminated in an exam. The instructors made everything clear and easy to understand and I thoroughly enjoyed myself. After completing the exam I was told my 'indicative' mark suggested that I had passed, but today I received my official certificate from the Radio Society of Great Britain.


26/01/2017

PoE to Micro USB Converter

Someone recently showed me their latest cheapo Chinese import gadget - a PoE to Micro USB Converter that they were using to power a non-PoE enabled device.  As I'm never too far away from a PoE enabled port and they've reached a reasonable price point (£5.19 inc P+P) I thought it was worth picking one up on Ebay. I ordered one on the 12th January and it arrived on the 26th which puts shipping bang on 2 weeks - not bad from China.

I've done some testing and it seems to be a little picky about its power source. The converter works fine with a 'proper' HP Procurve managed switch, but with a Netgear Prosafe switch the power light pulses on and off and the USB cable doesn't power up.

The converter is also lacking the molded tab to prevent the RJ45 from snagging shown in the picture above, so I'm not too optimistic about how long it will last before it needs re-crimping. I'm considering opening it up and placing it in a new enclosure with a proper USB A female socket to aid compatibility with other devices such as iPhones.

Overall for £5.19 I can't complain too much. I will use it a little more 'in the field' and do some load testing and follow up in another post. 

25/01/2017

First Post

I've dabbled with starting a blog in the past and thought it was about time I grabbed the bull by the horns so to speak. If anything it's aimed at documenting some of my trials and tribulations for myself, but if anyone happens to stumble across it and find it interesting / useful then all the better.